New clients usually ask how to setup call flow rules. Using the Gridare Client Portal, you can achieve the rules that you want on how incoming calls will be handled.
In this article, we will provide an example of a basic setup which is commonly used by other Gridare clients.
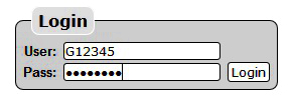
First, you need to login to your Gridare Client Portal (https://my.gridare.com/)

By now, you should have atleast one DID (Phone number) in the Groups section. Groups is a group of actions that your phone system is programmed to do.
In the example below, The phone number we will be setting up is 61212345678 (0212345678).
Example:
When a customer calls during business hours (e.g 9:00AM - 5:00PM), I want to :
Ring all of the phones for 25 seconds. If no-one answers or it is after hours, send the call to voicemail.
To achieve this,
1. Select Ring from the drop-down menu.

2. Since we want all phones to ring, put a check in all the boxes as shown below. The boxes represent the designated phone extension depending on how many you have. In the Time Out box, put 25. The Time Out box refers to the number of seconds on how long the phones will ring.

3. In the Time Conditions drop-down, select Range. Enter the Start Time and Stop Time following 24-hour clock and format of hours:minutes:seconds. In the example below, 9:00AM - 5:00PM is 9:00:00 - 17:00:00.
Lastly, specify the days that your office is open by putting a check in the boxes in the Days section. It should now look like the example below.
4. Now that you have setup your first row, let us now add the voicemail. Click on Add Row button to add another row
4. In the new row, click on the drop-down menu and select Voicemail

5. In the next drop-down, select the email address where you want to send the voicemail.
Note: Voicemails are converted into an email that includes the number calling, the length of the call and the audio attachment. This email will then be sent to the address that you have selected.
In the example below, I want the voicemails to be emailed to john.citizen@australia.com.au.
6. When you are done, click on the Save button to save your settings. DID61212345678 group should now look like the example below.
The system will follow the call flow based on the rows of actions you entered. It always start from the first row on top.
